Showing posts with label Gluten free. Show all posts

Monday, September 12, 2016

Pumpkin Greek Yogurt Oat Muffins

Pumpkin Greek Yogurt Oat Muffins for the freezer!

These muffins are gluten free if you buy gluten free oats. I found the original recipe on Running with Spoons, but changed these slightly to work for us! They are delicious and I'm so glad I found her recipe! Next time I may add pumpkin pie spice instead of the cinnamon. You can also add chocolate chips after blending if you like - that's her recommendation and I'm sure it's wonderful. We added these to our breakfast-to-go agenda and they are a hit!

Delicious, gluten-free pumpkin muffins!

 PUMPKIN GREEK YOGURT OAT MUFFINS

1 c. Greek yogurt
1 c. canned pumpkin
2 eggs
2 cups oats (quick or old-fashioned - I used the latter)
1/2 c. coconut sugar
1 1/2 tsp. baking powder
1/2 tsp. baking soda
1 1/2 tsp. cinnamon
1 1/2 tsp. vanilla
1/2 tsp. salt

Preheat oven to 400 degrees. Line a muffin tin with liners and spray (helps with release when you re-warm them later). 

Combine all ingredients in a blender. Blend until smooth. 

Fill each muffin cup 3/4 full. Bake for 15-17 minutes or until toothpick inserted comes out clean. 

These muffins came out of the oven fairly puffy, but will deflate just a bit as they sit, so no worries if you notice that!


Cool them completely and pop them in a freezer bag and into the freezer! Thaw a muffin in the microwave (about 25 seconds) and enjoy!

Monday, September 14, 2015

Easy Granola

Easy Granola is quick, delicious, and a great addition to breakfast!

Today, I was in a granola mood. I've been meaning to make a batch for approximately 1 billion days or something like that. :) This morning as I was doing dishes, putting dinner in the crockpot, and making breakfast, I thought...why not? And so I did. And it was easy and delicious. I adapted a recipe from Alton Brown - the biggest change is that I cut the brown sugar out all together. My goal was to make something healthy for us to put on our plain greek yogurt for breakfast parfaits. I think granola is ridiculously flexible in the flavor department and I'm looking forward to experimenting more! This would also be a cinch to make gluten free with gluten free oats and it's naturally dairy free.

Easy Granola

EASY GRANOLA

3 cups old-fashioned oat
1 c. pecans, chopped
1 c. almonds, chopped or slivered
3/4 c. plus a little more coconut
2 tsp. cinnamon (I actually used cinnamon plus which has a mix of spices)
1/4 oil
1/4 plus 2 TB. maple syrup
3/4 tsp of salt

Preheat oven to 250 degrees. Combine the oats, nuts, coconut, and cinnamon in a bowl. In a separate bowl, mix together the oil, syrup, and salt. Pour the liquids over the dry and stir until thoroughly combined. Evenly spread the mixture on a large bar pan. Bake for 1 hour 15 minutes until golden brown - stirring every 15 minutes. Let cool and store in an airtight container

That's it! Super easy, super delicious and totally adaptable. Next time I will add a couple of teaspoons of vanilla extract to the wet ingredients. You can add raisins after it comes out if you like that. I'm dreaming of all the variations - orange almond, apple cinnamon, vanilla coconut, cranberry spice...

Saturday, April 4, 2015

Ribbon Vegetable Salad

Ribbon Vegetable Salad

This easy and very fresh salad is gorgeous and delicious! You can quite easily substitute your favorite vegetables or herbs. I think dill, chives, or parsley would be especially excellent. My family loved this dish. The platter was completely devoured. I think it is a wonderful salad for welcoming spring!

Ribbon Vegetable Salad
RIBBON VEGETABLE SALAD

1 medium seedless cucumber, thinly sliced
1 medium red bell pepper, thinly sliced
3 medium carrots, peeled and thinly sliced
6 radishes, thinly sliced
1/2 medium red onion, thinly sliced
1 tsp. dried basil or 1/4 c. chopped fresh basil 

Dressing:
3 Tb. apple cider vinegar (or your favorite vinegar)
1 garlic cloves, minced
2 tsp. Dijon mustard (I used a Basil Dijon)
1 tsp. sugar
1/4 tsp. salt 
1/4 tsp. black pepper
3 Tb. canola or olive oil

Use a mandoline or spiral slicer to thinly slice the vegetables. Arrange on the platter and
sprinkle basil on top.

Combine the dressing ingredients and drizzle over the vegetables. Enjoy!


Monday, April 28, 2014

Curried Red Lentils

Curried Red Lentils are a healthy and easy dish for weeknight dinners!


What?! A post?! You probably thought we had forgotten what those were... :) In truth, we have been working on re-launch and are a couple of months behind where we hoped to be. Our lives have taken unexpected turns and have not allowed as much time as we would like for blogging. We do plan to be back on a semi-regular basis. We are excited to have a new look (still in progress). We have changed blog platforms, so please make sure to clear your past history (media cache) to make our site function for you (i.e. searching). Please know that we are still a work in progress and bear with us. We hope it will be worth it. On to the post for today...

These days, I need quick, healthy, and easy meals. Life with four kids - all with varying needs - leaves less time for meal planning and execution. These curried red lentils are always a hit, can be ready in 45 minutes or less, can be easily adapted, and are nutritionally great. This can also be made gluten-free, vegan, vegetarian, and dairy-free. While I have changed this recipe a fair bit and generally double it for my family, the original inspiration came from one of my favorite cookbooks, More With Less. I serve this over brown rice - just put it in your rice cooker with plenty of time to fully cook.

Curried Red Lentils
Red Curried Lentils

CURRIED RED LENTILS

1 c. red lentils (you can use brown or french, but texture will be different & cooking time maybe longer)
2 1/2 c. chicken, beef, or vegetable broth
1 bay leaf
1 tsp. salt

Bring to a boil and simmer for 20 minutes.

In a separate pan sauté together for 5-10 minutes:

1/4 c. butter, olive oil, or coconut oil
1 onion, diced
2 stalks celery, diced
2 carrots, peeled & diced
2 cloves garlic, minced

Add:

1 1/2 - 2 Tb. curry powder

Combine the veggie mixture and the lentils.

Add:
2 Tb. fresh lemon juice
2-3 Tb. fresh cilantro (plus more for serving)

Cook on low for just a few minutes stirring frequently to allow flavors to combine. Remove bay leaf before serving. Top with fresh cilantro and serve over rice, quinoa, or couscous.

Monday, August 12, 2013

Chocolate Teff Brownies

My husband and I were invited to a cook-out recently. He knew the couple hosting the event; I didn't know anyone. I volunteered to bring a dessert so that there would be something gluten-free available for my husband. A look through my pantry and through my favorite cookbook (as you likely know by now!), Nourishing Meals, and I settled on some Chocolate Chip Teff Brownies with an added dairy-free ganache. They were absolutely delicious and received rave reviews from the party goers.

Chocolate Teff Brownies

CHOCOLATE TEFF BROWNIES
(from Nourishing Meals by Alissa Segersten)
Print This Recipe

Dry Ingredients
1 c. teff flour
1/4 c. tapioca flour
1/3 c. cocoa powder
1 tsp baking powder
1/2 tsp baking soda
1/4 tsp sea salt

Wet Ingredients
1/2 c. dates, pitted
1/4 c. ground flaxseeds
1 1/4 c. boiling water
1/2 c. coconut oil
1/2 c. coconut sugar
2 tsp vanilla

Mix-in
1/2 c. chocolate chips

Preheat oven to 350ºF. Grease a 7 x 11 baking dish.

In a mixing bowl, whisk together the dry ingredients. Set aside.

Place the dates and ground flaxseeds into a blender; pour the boiling water over them. Let sit for 10 minutes. Then add the rest of the wet ingredients and blend until smooth and creamy.

Add the wet ingredients to the dry and quickly whisk together. Add the chocolate chips and continue to whisk until thoroughly combined.

Pour better into pan and bake for 20-25 minutes.

Chocolate Ganache Frosting

3 oz chocolate chips
1/4 c. coconut milk
2 Tbsp maple syrup

Place all ingredients into a small pan and heat over low. Stir continuously until melted and thickened, just about 2 minutes. Remove from heat and let cool for about 5 minutes. Do not chill. Drizzle over brownies.

Or, if you would like a thick, creamy, spreadable frosting then let the ganache thicken at room temperature for about 3 hours.

Monday, August 5, 2013

Spinach Pesto Pasta

I love a good pesto during the summer. In the past I have not had particularly great success with making my own pesto. I just never felt like I got the flavor and texture correct. And now, since going dairy-free, I have to consider pesto without the Parmesan cheese. I decided to mesh a couple of recipes together to create this dairy-free pesto to go over a roasted tomato and white bean pasta dish. It was delicious! And the leftover pesto is great for topping homemade pizza or using for a pita bread dip.

IMG_1765

SPINACH PESTO
Print This Recipe


2 1/2 c. baby spinach
1/2 c. fresh basil leaves
1/2 c. walnut pieces
2 cloves garlic, minced
juice of one lemon
2 Tbsp nutritional yeast
1/4 c. olive oil
salt and pepper to taste
1/8 tsp cayenne pepper

Add the spinach, basil, walnuts, garlic, and lemon juice into the bowl of a food processor. Pulse until everything is broken down into small pieces. Add the nutritional yeast, olive oil, salt, pepper, and cayenne. Whirl until the pesto is smooth.

Monday, July 29, 2013

Whole-Grain Freezer Waffles

I recently started a full-time job. With an hour of commute time each day, I knew my meal prep time was going to be disappearing. So, the week before work began I spent time making some muffins, granola bars, pita breads, and waffles for the freezer. I intended to get a lot more frozen than that, but it was a start.

The waffles are delicious and work from freezer to toaster. And this week when I didn't know what I was going to fix for supper, we enjoyed breakfast for dinner. These are gluten-free, whole-grain, and egg-free!

For the waffles, I used a recipe from my go-to cookbook, Nourishing Meals. First make a batch of dry mix (which keeps in the pantry for up to 4 months, so make as many batches you want!). Then make the waffles. I made a triple batch, which made 26 waffles in my rather small waffle maker.

Gluten-free Waffles

WHOLE-GRAIN FREEZER WAFFLES
(from Nourishing Meals by Alissa Segersten)
Print This Recipe

DRY MIX
1 1/2 c. brown rice flour
1 c. teff flour
1 c. millet flour
1 c. tapioca flour
1/2 c. quinoa flour
4 tsp baking powder
2 tsp baking soda
2 tsp cinnamon (opt.)
1 tsp sea salt

Place all ingredients into a large bowl. Using a wire whisk, mix well. Place into an airtight container. Makes 5 cups or 5 batches of waffles.

WAFFLES
2 Tbsp waffles
2 Tbsp very hot water
2 Tbsp unsweetened applesauce
2 Tbsp melted coconut oil
1 Tbsp maple syrup
1 c. milk (I used almond milk)
1 c. Waffle mix

Place the ground flax seeds and hot water into a medium-sized mixing bowl; quickly whisk together until the flax forms a thick gel. Sometimes this doesn't happen right away so keep whisking until the gel forms. Add the applesauce, coconut oil, maple syrup, and milk and whisk together well. Then add the waffle mix. Whisk together until the batter is smooth.

Heat waffle maker and cook according to waffle make directions.

If you plan to freeze them, cool completely and then layer between pieces of waxed paper and place in freezer bags.

Monday, July 22, 2013

Red Lentil Balls

I love the versatility of meatballs and in my quest to cook meals that don't rely on meat, I've had to use my imagination a bit. I recently picked up Vegetarian Everyday from the library and was pleased to discover a bean based "meatball" recipe, perfect for the gluten-free vegetarian. The couple that created this cookbook is from Sweden (they have a lovely blog I follow called Green Kitchen Stories) and they call these tasty legume-balls, polpette (which is a fancy word for meatballs, as far as my research can tell me). But anyway, the words flows off the tongue in such a beautiful way.

The photo does not do justice to the deliciousness of this meal, in fact it makes it look rather unappealing, but we loved these! I served them over a bed of zucchini and carrot noodles (long julienned veggie that I blanched in salted water) and we topped them with a little marinara sauce and a little arugula pesto.

Red Lentil Polpettes

RED LENTIL BALLS
(from Vegetarian Everyday by David Frenkiel & Luise Vindahl)
Print This Recipe


1 c. red lentils
1/2 red onion, finely chopped
2 cloves garlic, minced
3 Tbsp extra virgin olive oil
2 Tbsp tomato paste
1/3 c. rolled oats (use gluten-free, if needed)
1 tsp paprika (I used smoked paprika)
1/8 tsp cayenne pepper
sea salt to taste

Rinse the lentils and place in a saucepan with 2 1/4 cups cold water. Bring to a boil, then reduce the heat and simmer gently for 15 minutes or until tender. Drain well and cool slightly.

Mash the lentils with a fork. The consistency you want is mashed but still with some lentils left whole. Place in a mixing bowl, add the remaining ingredients and stir with a spoon until everything is combined. Place int he fridge for 30 minutes.

Preheat the oven to 375º F. Line a baking sheet with parchment paper. Form balls and place them on the baking sheet. Bake for 17-22 minutes. If you want, turn balls halfway through to get a more even shape and color.

Prepare pasta or veggie noodles and whatever sauce you want.

Friday, July 19, 2013

Chocolate Coconut Milk Ice Cream

Here's a delicious treat for your weekend! This is a recipe that I posted a long while back, but it is buried in a post with another recipe. And since it is quick and fairly healthy, I decided to re-post. Plus, it's summer, so who doesn't love some ice cream?!

I should note that the original recipe is  not mine; however, I do not remember where I found it. This time around I did add a 1/2 teaspoon of almond extract, which was a nice twist.

IMG_1763

CHOCOLATE COCONUT MILK ICE CREAM
Print This Recipe


2-14 oz cans full-fat coconut milk
2/3 c. sugar or agave nectar (I used coconut sugar)
1/4 c.  unsweetened cocoa powder
1 1/2  tsp vanilla extract (feel free to replace 1/2 tsp of vanilla with 1/2 tsp almond extract)

Place all ingredients in a blender and blend thoroughly. Refrigerate for 30 minutes.

Pour into the bowl of an ice cream freezer and freeze according to the manufacturer’s directions. Serves 4.

Monday, June 24, 2013

Vegan Chocolate Chip Cookies

I think I found this recipe in The Happy Herbivore cookbook. But as I didn't notate that information, I'm not for sure. :) I certainly cannot take credit for these. While these aren't your typical melt-in-your-mouth chocolate chip cookies, they are good and a great healthy treat, with no added fat and not too much sugar. Plus, the are gluten-free! They have become our go-to dessert when we need a little sweet fix. Within 30 minutes you can enjoy warm cookies from the oven!

Vegan Chocolate Chip Cookies

VEGAN CHOCOLATE CHIP COOKIES
Print This Recipe


1/3 c. unsweetened applesauce
1/2 c. coconut sugar or brown sugar
1 tsp vanilla
1/4 c. non-dairy milk
1 c. gluten-free all purpose flour mix
1 tsp baking powder
1/4 tsp salt
1 Tbsp cornstarch or arrowroot powder
1/4 tsp cinnamon
1/2 c. chocolate chips

Preheat oven to 350°F. Grease cookie sheet or line with parchment paper.

In a bowl combine applesauce, sugar, vanilla, and milk. In a small bowl, whisk together flour, baking powder, salt, cornstarch, and cinnamon. Pour dry ingredients into wet in three batches, stirring to combine. Fold in chocolate chips.

Drop by spoonfuls on cookie sheet. Bake for 11-13 minutes.

Makes 15 cookies.

Monday, June 17, 2013

Asian Broccoli Bowls

We love ethnic food in our house and since transitioning to a predominately vegetarian diet, we love it even more! So many ethnic dishes are already tailored towards plant-based eating. This dish was inspired by the Peas and Thank You recipe Szechuan Broccoli and Quinoa. I made a few minor adjustments to the sauce and added several ingredients to make this a main-dish meal for us. It's so tasty that I've made it twice in the last week! And the leftovers are delicious too!

Feel free to substitute your veggies of choice, just adjust cooking times as needed.

Don't let the long list of ingredients and instructions deter you from trying this. Once you get your veggies prepped, this meal comes together quite quickly.

Asian Broccoli Bowls

ASIAN BROCCOLI BOWLS
(adapted from peasandthankyou.com)
Print This Recipe

Cooked Quinoa or Brown Rice (use half broth for the cooking liquid)

1-1/2 lbs broccoli florets
1/2 lb mushrooms, cut into chunks
1-2 onions, cut into chunks
sesame oil and/or olive oil for drizzling
season to taste

1/2 lb extra-firm tofu, cut into small cubes
sesame oil and tamari sauce for drizzling
season to taste

Sauce
1/4 c. tamari
1/4 c. vegetable broth
1 Tbsp maple syrup or agave nectar
1 Tbsp sweet red chili sauce, such as Thai Kitchen Brand (opt.)
1/4 tsp ginger powder
1-2 cloves garlic, minced
1 Tbsp ground flax seed
1/2 tsp red pepper flakes

Cook the quinoa or brown rice according to package instructions.

Cut the tofu into cubes. Lay a clean towel on a cutting board and place the tofu on top. Either fold over that towel to cover or lay a second towel on top. Place another cutting board or baking sheet on top and stack a few heavy items to create a tofu "press." (Cookbooks work well.) Leave the tofu to press for 30-60 minutes.

Cut up veggies.

Preheat the broiler.

Arrange mushrooms and onions on a medium baking sheet and drizzle with a little sesame oil or olive oil; if desired, sprinkle with a little salt, red pepper flakes, and garlic powder, if desired. Arrange pressed tofu cubes onto another medium baking sheet, drizzle with a little sesame oil and tamari sauce; if desired, season with a little salt, ginger powder, garlic powder, and red pepper flakes. Arrange broccoli florets on a large baking sheet and drizzle with a little sesame oil.

If your oven size allows, broil the mushrooms and onions alongside the tofu for 10-15 minutes, stirring once. Then place on the bottom rack to keep warm while you broil the broccoli for 6-9 minutes, stirring once and making sure not to burn.

While the veggies and tofu are broiling, make the sauce. In a small saucepan, combine all of the sauce ingredients. Bring to a boil over medium-high heat, stirring constantly. Lower heat and simmer for a minute or two, until thickened. Remove from heat.

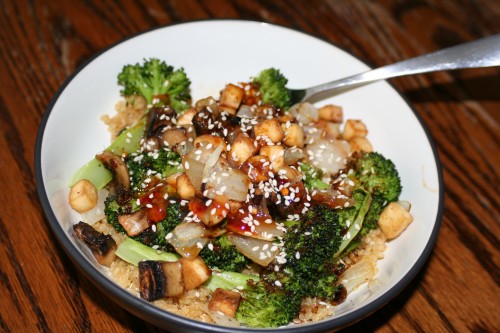
Scoop quinoa or rice into each bowl, top with the roasted veggies and tofu, drizzle with the sauce and sprinkle sesame seeds on top.

Monday, May 27, 2013

Dairy-free Queso

I cannot in the least take credit for this recipe. When it comes to homemade, vegan cheese alternatives, I am still very much in the learning stage. But, as I explore the dairy-free world, I'm always happy to find a good recipe. And maybe before too long I'll be adept enough to create my own dairy-free "cheese" recipes.

I made a batch of this cashew queso recipe, with two notable alterations: I did not add the miso because I didn't have it on hand and I added a 1/2 tsp of chipotle chile powder for a smoky undertone. Additionally, I made sure to include the optional nutritional yeast. While the recipe is a little labor intensive, I felt like it was worth the effort. Plus the queso keeps and re-heats well. (Note: if you do use the miso, check to make sure it is gluten-free if you need that. As I understand it, not all miso is gluten-free.)

Cashew Queso Nachos

For a quick weeknight meal I made nachos (something we rarely eat, but certainly enjoy) by topping tortilla chips with a spiced pepper, onion, and bean mixture and some queso. I broiled it all for a couple of minutes and then added some guacamole (makes any Mexican dish tastier!) and green onions. It was delicious!

Monday, May 20, 2013

Collard Green Wrap

Today's post is not really a recipe, but rather a concept. :) Overall, being gluten-free isn't altogether difficult, but there are times when I miss the ease of everyday breads, tortillas, and other baked goods. It takes more effort to make or more financial investment to purchase adequate alternatives.

My pantry typically includes corn tortillas for soft tacos or enchiladas, rice cakes for snacks, and Rudi's Multigrain GF Bread for toast, garlic bread, and pb&j sandwiches.  Occasionally I splurge on gluten-free tortillas (other than the corn variety) so I can make hummus veggie wraps or bean and grain wraps.

Recently I tried using blanched collard greens for wraps and it worked out quite well. Once blanched the greens do not have a strong flavor, so you're able to enjoy the filling. Not only does it save some money to use collard greens, but it also facilitates eating more leafy green veggies, which is excellent for all of us. I've seen this idea on a few healthy eating oriented blogs, but I followed the directions in the Nourishing Meals cookbook (are you getting the idea that I used this cookbook all of the time?!).

Collard Green Wraps

BLANCHED COLLARD GREEN WRAPS

To prepare the collard greens for wrapping: Wash the greens and cut the stem off the bottom of each leaf. Bring a large pot of water to a boil. Blanch the collard greens by submerging them in the boiling water for about a minutes. Gently remove them with tongs and place them on a plate to cool.

To assemble your collard green wrap: Place a collard green on a cutting board. Spoon your desired filling near the stem end of the the green. Fold in the long ends of the collard green about 1 inch on each side and then tightly roll.

Monday, May 13, 2013

Gluten-Free Pita Bread

These pita pockets can be made in about 25 minutes. They are dairy-free, egg-free, yeast-free, and gluten-free. And despite all that "free-ness" they are delicious. We enjoy them dipped in hummus, as mini pizza crusts, or as pockets to stuff with veggies for a sandwich.

I have found that these don't create their own "pockets" very well, which just means I have to cut them open myself, not a big deal to me. I also love that these freeze well, so I often make a double batch and freeze half. I like to freeze some in pocket form and some just whole.

The original recipe calls for using just sorghum flour and sweet rice flour. I have successfully replaced up to a 1/4 cup of the sorghum flour with teff flour or brown rice flour. I also sometimes add some herbs or spices depending on what I plan to use the pitas for (ie adding Italian seasonings when I use them for pizza crusts).

Gluten-Free Pita Bread

GLUTEN-FREE PITA BREAD
(from Nourishing Meals)
Print This Recipe

1 1/4 c. warm water
6 Tbsp ground flax seed
2 Tbsp extra virgin olive oil
1 Tbsp apple cider vinegar

1 1/2 c. sorghum flour
1/2 -- 3/4 c. sweet rice flour (in the mountains here I always have to add the larger amount of flour, but start with the lesser amount first)
1/2 tsp sea salt
1/2 tsp baking soda
Herbs or spices, opt.

Preheat the oven to broil/550°F. Line one or two baking sheets with parchment paper. Position the oven rack in the center of the oven, not right underneath the broiler.

In a medium bowl, whisk together the warm water and ground flax seed. Let rest for about 5 minutes to thicken. Then whisk in the olive oil and apple cider vinegar.

Add the dry ingredients to the wet and use a fork to mix together. You should be able to form a ball of dough that is not too sticky or too dry. If the dough is sticky add in extra sweet rice flour (up to the additional 1/4 cup). If the dough is dry, add a little water.

Divide the dough into 5 equal pieces (I've done 6 smaller pitas or 4 larger pitas too, depending on what I'm using them for). Using wet hands, roll each piece of dough into a ball and then flatten with your hands until they are 5-6 inch circles. Place onto the parchment lined baking sheet. If you're using a large baking sheet, you should be able to fit all the pitas on there (they don't spread much). Otherwise use two baking sheets.

Bake for 10-12 minutes, flipping each pita after 6 minutes. The pitas bubble slightly and get golden around the edges when done. After they are cooled, slice them in half and cut the bread to form a pocket.

If not using right away, layer these between waxed paper and store in a sealed container. Or freeze.

Monday, May 6, 2013

Baked Pasta Chee

This recipe hearkens back to my childhood. My mom used to make this and we all loved it. It's a healthy, tasty, baked, non-dairy mac-n-cheese-type recipe. And it has become a staple dinner at our house. I make it every couple of weeks and we enjoy the leftovers for lunches.

The original recipe comes from an unusual cookbook called Ten Talents. To add extra healthful benefits I've altered the recipe to include veggies. Any chance I can get to add more veggies to a dish, I'll take. I've listed the veggies I most often use, but feel free to substitute with your favorites, or what you have on hand.

One note, the sauce includes an uncommon ingredient, nutritional yeast. Nutritional yeast flakes are often used to add a "cheesy" taste to non-dairy "cheese" recipes. It can be found at a health food store and there really isn't any substitute for it. (Active dry yeast and brewer's yeast are not anything like nutritional yeast.) I hope you might consider trying this dish despite the ingredient list, it's worth the effort.


(Finally, I realize this is not the prettiest of pictures. But I promise it tastes delicious!)

Baked Pasta Chee

BAKED PASTA CHEE
(adapted from Ten Talents)
Print This Recipe

1 lb pasta of choice (use brown rice pasta for gluten-free)
1 c. raw cashew pieces
1 c. water
1/3 c. fresh lemon juice
2 Tbsp sesame seeds
1/4 c. nutritional yeast flakes
1 1/2 tsp salt
1 tsp onion powder
1/2 tsp garlic powder
1/2 tsp smoked paprika (opt.)
1/8 tsp black pepper
1/4 c. olive oil
4 mushrooms
1/2-1 bell pepper
1 big handful baby kale
1 c. diced tomatoes

Preheat oven to 350°F.

Cook pasta according to package directions. Drain.

While pasta is cooking, make the sauce. In a blender add cashews, water, lemon juice, sesame seeds, nutritional yeast, salt, and spices. Blend until smooth while slowly adding the olive oil through the top. Then add the veggies and canned tomatoes and blend again.

Mix the drained pasta and sauce together and pour into greased baking dish. If desired, top with seasoned bread crumbs. Bake for 30-40 minutes to heat through.

Serve with a salad for a satisfying meal.

Monday, April 29, 2013

Savory Spiced Nuts

Nuts are a staple snack in our house. In the interest of health, I've been avoiding buying the pre-roasted, salted varieties. So, I buy raw nuts and toast and spice them myself. This is our favorite savory spiced nut recipe thus far. It's also quite easy as it's all made on the stovetop. Once completely cooled, store the nuts in a glass jar.

Savory Spiced Nuts

SAVORY SPICED NUTS
Print This Recipe


1 Tbsp olive oil
1 tsp smoked paprika
1/2 tsp salt
1/4 tsp garlic powder
1/4 tsp onion powder
1/8 tsp chili powder
1/8 tsp black pepper
1/8-1/4 tsp cayenne
1 c. raw almonds
1 c. raw walnuts
1/2 c. raw sunflower seeds

In a large skillet, heat olive oil over medium heat. Add all the spices and stir to make a paste. Add almonds, walnuts, and sunflower seeds and stir to coat evenly. Continue stirring the nuts, toasting until fragrant, about 5 minutes. Cool in the pan.

Monday, April 22, 2013

Baked Falafel

I love falafels because of my dad. He instilled a love of ethnic foods in all of us. My first falafel memory is an amazing falafel sandwich at a little mom and pop restaurant with my dad. Now when I have the chance to visit home again, my dad and I enjoy sharing conversation over a falafel lunch.

Traditional falafels are fried which makes them crunchy on the outside (and oh so delicious!). This baked version is much more tender, but the flavor is fantastic. My husband and I enjoyed these falafels piled on top of pita with veggies and homemade hummus.

Baked Falafel

BAKED FALAFEL
(from Parents Need to Eat Too)
Print This Recipe

1-15oz can chickpeas, drained and rinsed
1 small onion, roughly chopped
2 cloves garlic, minced
3 Tbsp roughly chopped fresh parsley or cilantro
1 tsp cumin
1/2 tsp ground coriander
1/4 tsp cayenne
2 Tbsp flour or rice flour
1 tsp baking powder
3 Tbsp fresh lemon juice, divided
3 Tbsp olive oil, divided
salt and pepper
Mixture of salad veggies (lettuce, tomato, cucumber, mushroom, bell pepper)
Pitas
Hummus, tzatziki, tahini

Preheat the oven to 450°F. Set racks in upper and lower thirds of oven. Grease or line 2 baking sheets.

In a food processor combine the chickpeas, onion, garlic, parsley or cilantro, spices, flour, baking powder, half of the lemon juice, 1 Tbsp of the olive oil, salt and pepper to taste. Pulse until well combined but mixture is still relatively coarse, you don't want a puree.

Using your hands or a small cookie scoop, shape the mixture into 18-24 balls (about 1 1/2 inches in diameter). Arrange on the baking sheets and flatten each slightly. Brush the tops with 1 tablespoon of the remaining olive oil.

Bake for 10-12 minutes, then turn patties (rotating trays); bake for another 10-12 minutes. The patties are tender so be careful when turning.

Toss the salad veggies with the remaining lemon juice, olive oil, salt and pepper to taste.

Serve the falafels with veggies, pita, and hummus (or tzatziki or tahini).

Tuesday, April 9, 2013

In My Kitchen

It's been awhile, I know. But I have a few posts planned and thought you might enjoy a brief update on life in my kitchen.

The Year of the Olive experiment is going well. While I don't love kalamata olives yet, I am enjoying them as an occasional accompaniment. For one dinner I stuffed bell peppers with a Greek-type filling of rice, chickpeas, onion, olives, parsley, lemon juice, etc. Quite tasty. Jeremy and I have also enjoyed sauteed kale with chopped olives and walnuts. I'm not ready to move on black olives yet, but perhaps this summer.

My gluten-free baking skills have taken a hit since my move last fall. Altitude. Texture is a huge factor in gf baking and altitude is forcing me to re-teach myself some of my skills. Everything I've made so far has been edible, but the texture is not quite right about 50% of the time. So, you won't be seeing a lot of baking recipes from me for at least awhile.
Image

For the past month or so Jeremy and I have enjoyed experimenting with a plant-based diet. Doing without animal products has forced me to think outside the box with my meals (such as the Mediterranean plate pictured above). We've eaten very well. I don't know how long we'll continue eating this way, but it's been a great experience. I plan to share a few of our favorite plant-based recipes with you here.

Stay tuned for some new recipes. Until then, I hope you're finding inspiration in your kitchen.

Saturday, June 2, 2012

Compote, Cake, and Custard

A trip to the farmer's market this morning yielded strawberries, asparagus, and rhubarb all sure signs of spring and the coming summer! I've been an anti-rhubarb girl for as long as I can remember, but I decided this year to give it a try. Spring is a wonderful time to try something new as fresh fruits and veggies are once again making their seasonal appearances so they are at their peak flavor.

And so, after a long work week, I decided to spend my Saturday afternoon in the kitchen. Inspired by the fresh produce, as well as several blogs I follow, I got busy.


First up was a gluten-free lemon sponge cake recipe courtesy of Cannelle et Vanille. The ingredient list was simple and I thought it would be perfect with some lightly sweetened, sliced strawberries. The end result wasn't as lemony as I'd expected, but it is still delicious.

Next, I tackled my rhubarb, making a simple compote that I figured I could spoon over the sponge cake, eat with yogurt or vanilla pudding. I used the basic recipe from Simple Bites. While I'm not yet in love with rhubarb, I did enjoy this easy dish and I hope to try out a few other rhubarb recipes.

Finally, I decided since I didn't have any whipping cream on hand, that a nice vanilla pudding would the perfect conclusion to my afternoon kitchen dabbling. I followed the recipe from Smitten Kitchen, though sadly I didn't have any vanilla beans, so vanilla extract it was for me. How can you go wrong with pudding? It will be delicious with any of my other creations.

I hope you too are being inspired by fresh, spring produce.

Friday, May 11, 2012

Zucchini Noodles

A couple of weeks ago I came up with the amazing and revolutionary idea to make zucchini noodles. While I'm more than certain that many people before me have done this very thing, it still felt like my idea. :) While this post doesn't contain an actual recipe, I'm going to share with you how I made my zucchini noodles. Perhaps it will inspire you as well!

I took my Pampered Chef julienne peeler (a birthday gift last year that I've used many, many times!) and cut down the length of a washed and trimmed zucchini, creating zucchini "noodles." Once I'd sliced all my zucchinis into noodles, I placed the lovely green pile into a fine mesh colander and salted them with about 1/4 teaspoon of sea salt (the salt draws out some of the water from the zucchini).


Then I left it to drain for about 30 minutes, squeezing out the excess moisture before sauteing in a little butter and olive oil for about 5 minutes. I seasoned them with a little more salt, pepper, and Italian spices before topping the noodles off with caramelized onions, sauteed mushrooms, a little sausage, and marinara sauce. It was delicious! I might even like it better then the pasta. And, if you're a spaghetti noodle twirler, zucchini noodles will twirl around your fork too!

If you too would like to make zucchini noodles and don't yet have a julienne peeler, I highly recommend you get one. :) It's a small gadget, but well worth the space it will take up next to your vegetable peeler. I also like to use it to matchstick carrots for salads or stir-fries (they cook up much more quickly!).