Showing posts with label quick. Show all posts

Wednesday, February 17, 2016

Fonio & Lentil Bake

Fonio is a new (old) superfood with delicious flexibility!

I recently received a sample of an African grain called Fonio from Earth's Goodness.  I love to cook and I love to try new things, so I was curious to try it! This ancient grain boasts some great health benefits and is easy to cook. It's rich in calcium, magnesium, zinc, manganese, and amino acids. Fonio is also gluten free, easily digestible, and diabetic friendly. A nutrient dense, flexible grain is a win in my book.

Earth's Goodness Fonio


My family loved this recipe! It was admittedly hard to photograph, but trust me on this one - it was really delicious! It had a creamy texture with the contrast of the lentils. The parmesan really elevated it. It reminded me a bit of polenta. It's creamier than couscous - more like a hot cereal.

Fonio & Lentil Bake makes a great main dish or side dish!


FONIO & LENTIL BAKE

6 c. vegetable or chicken broth
1 1/2 c. fonio (rinsed)
1 c. lentils (I used red)
1 onion, diced
2 tsp. Itlaian seasoning
1 tsp. salt
1/2 tsp. pepper
Fresh parmesan

Pre-heat oven to 325 degrees F. Stir all of the ingredients together and put in a 9x13 pan covered with foil or in a covered oven-proof pot. Bake for 50-60 minutes until creamy, but lentils still have some texture. Uncover and grate fresh parmesan over top and bake for another 10 minutes. Serve with more parmesan.

I think this would be fantastic with a pork chop or steak and a side of broccoli or brussel sprouts. It was creamy, flavorful, and filling. It cooked quickly and took on the flavor of the seasonings. Delicious! I'm really looking forward to trying more recipes with fonio. I'm planning to try it as a hot cereal next - perhaps topped with apples and cinnamon! Earth's Goodness has some delicious recipe suggestions!

Where can you buy Fonio? Check out Earth's Goodness!


**DISCLAIMER: These opinions are my own. I did receive a sample and compensation in exchange for my honest review of this grain. 

Wednesday, March 4, 2015

Vegan Sesame Noodles

Vegan Sesame Noodles

We celebrate the wonderful birth heritages of our children and so that means we celebrated the Chinese New Year a couple of weeks ago! It's the year of the sheep/goat/ram and is actually my Chinese birth symbol.

Since my vegan parents were joining us, I wanted to make sure and  have a few dishes that fit that category. These were AMAZING. I could have eaten the entire bowl by myself. You can eat them warm (my favorite), room temperature (recommended), or cold (leftover). Any way you choose, they are fabulous! I found the original recipe that I based my noodles on at RasaMalaysia

You can use this for a quick dinner, easy make-ahead lunch, or side dish. Our family loved it!

Vegan Sesame Noodles
VEGAN SESAME NOODLES

16 oz. spaghetti
1/4 c. oil
sesame seeds for garnish (I only had white, but black would be great, too!)
green onions, sliced for garnish
sesame sauce (see recipe below)

Cook the noodles according to the package. Rinse in cold running water and drain. Set aside.
Heat up a skillet or wok on medium heat and with the oil. Add the pasta and give a few turns. Add the sesame sauce to the noodles and toss to combine well and heat through. Remove from the heat and garnish with sesame seeds and green onions. Serves 6-8.

Sesame Sauce:
1/4 c. plus 1 Tb. tahini paste, slightly warmed
2 Tb. natural peanut butter
3 Tb. soy sauce
1-2 tsp. sugar
1 Tb. rice vinegar (you can use apple cider if you don't have rice)
2 Tb. sesame oil
pinch of chili flakes
salt to taste

Combine all sauce ingredients in a pourable measuring cup and set aside. (Be sure and taste the sauce and adjust for your palate.)

Sunday, March 1, 2015

Biscuits & Gravy

Biscuits & Gravy

Here's the deal - biscuits and gravy = awesome!

A family favorite - biscuits & gravy.

It is a popular (often associated with the South) breakfast that is super easy to make, but I think it would also make a wonderful brunch or a quick breakfast for dinner recipe (with a side of vegetables, of course ;)). It's a rare treat around here, but highly anticipated.

You can use the pop biscuits from the can...but really, just make them from scratch...so worth it! I have spent years trying to make the perfect biscuits that have light layers and finally my search has ended. There are two recipes that I have found worthy of ending the search - Alton Brown's Biscuits and Smitten Kitchen's Biscuits. They are slightly different and for the sake of not using shortening, I chose the latter today, but I have tried both and they are both wonderful.


Light, Fluffy, Golden, and Tall - biscuit perfection!

BISCUITS
(slightly adapted from Smitten Kitchen)

2 1/4 c. flour

1 1/2 tsp. sugar (if you want a sweeter biscuit sometime, just increase this)
1 Tb. baking powder
3/4 tsp. baking soda
3/4 tsp. salt
9 Tb. chilled unsalted butter, cut into small chunks
3/4 c. buttermilk or soured milk

Heat oven to 400 °F. Stir together flour, sugar, baking powder, salt and baking soda in large, wide bowl. Using pastry blender, cut butter into dry ingredients until the mixture resembles a coarse meal, Add milk and stir until large clumps form. Reach hands into bowl and knead mixture briefly until it just holds together (add a little more milk if needed).

Transfer dough to floured counter and pat out until 1/2 to 3/4-inch thick. Using a round cutter (2 inches for regular sized biscuits), press straight down and transfer rounds to baking stone* (or metal pan if you prefer).

Bake until biscuits are golden brown on top - 12 to 15 minutes. Serve hot!

This will make about 12-14 2-inch biscuits

*I bake on stones. I am a firm believer in their awesomeness and find that my baked goods are simply better when I use them.

**You can add in cheese or herbs with the dry ingredients, if you want to make these fancy.

Cast Iron Skillet = one of my favorite kitchen items.

Here's the deal on the gravy - you can use however much sausage you like. I love the flavor that it gives, but I like to stretch my meat and don't like a really meaty gravy. This is how I do it and it is perfect for us - great gravy to meat ratio. I do think the two things that make this simple gravy awesome is the iron skillet and the amount of pepper. Oh and you can halve this recipe for 2-4 people. My people eat a lot and this was scraped clean by our family of 6. :)


SAUSAGE GRAVY

1/2 lb. bulk sausage
1/2 c. flour
4 c. milk
salt
fresh ground pepper

In a large cast iron skillet (If you don't own one, go buy one because you will use it for everything...but in the mean time, you can use a regular skillet.), brown your sausage, breaking it up into small pieces. Once browned, stir in flour and continue cooking for a minute or two. Slowly stir in the milk. Add salt & pepper to taste (I did about 1/2 tsp of each, but taste as you go to adjust for your palate and for the seasoning of your sausage). Continue to stir and loosen any bits from the bottom of the skillet until the gravy is just starting to bubble and gravy is thick. Serves over hot biscuits. 

Friday, July 19, 2013

Chocolate Coconut Milk Ice Cream

Here's a delicious treat for your weekend! This is a recipe that I posted a long while back, but it is buried in a post with another recipe. And since it is quick and fairly healthy, I decided to re-post. Plus, it's summer, so who doesn't love some ice cream?!

I should note that the original recipe is  not mine; however, I do not remember where I found it. This time around I did add a 1/2 teaspoon of almond extract, which was a nice twist.

IMG_1763

CHOCOLATE COCONUT MILK ICE CREAM
Print This Recipe


2-14 oz cans full-fat coconut milk
2/3 c. sugar or agave nectar (I used coconut sugar)
1/4 c.  unsweetened cocoa powder
1 1/2  tsp vanilla extract (feel free to replace 1/2 tsp of vanilla with 1/2 tsp almond extract)

Place all ingredients in a blender and blend thoroughly. Refrigerate for 30 minutes.

Pour into the bowl of an ice cream freezer and freeze according to the manufacturer’s directions. Serves 4.

Monday, June 24, 2013

Vegan Chocolate Chip Cookies

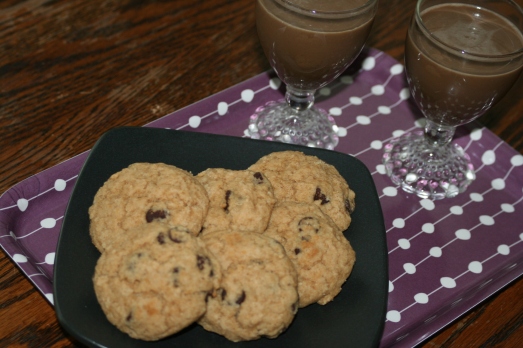
I think I found this recipe in The Happy Herbivore cookbook. But as I didn't notate that information, I'm not for sure. :) I certainly cannot take credit for these. While these aren't your typical melt-in-your-mouth chocolate chip cookies, they are good and a great healthy treat, with no added fat and not too much sugar. Plus, the are gluten-free! They have become our go-to dessert when we need a little sweet fix. Within 30 minutes you can enjoy warm cookies from the oven!

Vegan Chocolate Chip Cookies

VEGAN CHOCOLATE CHIP COOKIES
Print This Recipe


1/3 c. unsweetened applesauce
1/2 c. coconut sugar or brown sugar
1 tsp vanilla
1/4 c. non-dairy milk
1 c. gluten-free all purpose flour mix
1 tsp baking powder
1/4 tsp salt
1 Tbsp cornstarch or arrowroot powder
1/4 tsp cinnamon
1/2 c. chocolate chips

Preheat oven to 350°F. Grease cookie sheet or line with parchment paper.

In a bowl combine applesauce, sugar, vanilla, and milk. In a small bowl, whisk together flour, baking powder, salt, cornstarch, and cinnamon. Pour dry ingredients into wet in three batches, stirring to combine. Fold in chocolate chips.

Drop by spoonfuls on cookie sheet. Bake for 11-13 minutes.

Makes 15 cookies.

Friday, May 11, 2012

Zucchini Noodles

A couple of weeks ago I came up with the amazing and revolutionary idea to make zucchini noodles. While I'm more than certain that many people before me have done this very thing, it still felt like my idea. :) While this post doesn't contain an actual recipe, I'm going to share with you how I made my zucchini noodles. Perhaps it will inspire you as well!

I took my Pampered Chef julienne peeler (a birthday gift last year that I've used many, many times!) and cut down the length of a washed and trimmed zucchini, creating zucchini "noodles." Once I'd sliced all my zucchinis into noodles, I placed the lovely green pile into a fine mesh colander and salted them with about 1/4 teaspoon of sea salt (the salt draws out some of the water from the zucchini).


Then I left it to drain for about 30 minutes, squeezing out the excess moisture before sauteing in a little butter and olive oil for about 5 minutes. I seasoned them with a little more salt, pepper, and Italian spices before topping the noodles off with caramelized onions, sauteed mushrooms, a little sausage, and marinara sauce. It was delicious! I might even like it better then the pasta. And, if you're a spaghetti noodle twirler, zucchini noodles will twirl around your fork too!

If you too would like to make zucchini noodles and don't yet have a julienne peeler, I highly recommend you get one. :) It's a small gadget, but well worth the space it will take up next to your vegetable peeler. I also like to use it to matchstick carrots for salads or stir-fries (they cook up much more quickly!).

Friday, March 2, 2012

Stove-Top Baked Beans

The other night I made these baked beans for supper accompanied by a mixed green salad and biscuits. It was delicious, nourishing, and filling. I usually think of baked beans as a side dish, but we love this recipe so much that it's our main course (since I first made this a couple months ago, it's been in regular rotation). And Jeremy happily anticipates the leftovers in his lunch the next day.

I typically soak and cook my own beans, but canned work just as well, feel free to add more beans if you want them a little less saucy--I often do that. I love that this is so full of flavor and spice with just a hint of sweetness. Try this recipe, for a main dish or a side, you'll be glad to have it in your repertoire.


STOVE-TOP BAKED BEANS
(slightly adapted from Ellie Krieger)
Print This Recipe

1 Tbsp olive oil
1 onion, finely chopped
1/2 bell pepper, finely chopped
1 clove garlic, minced
8 oz can tomato sauce
2-3 Tbsp brown sugar
1 Tbsp tomato paste
1 Tbsp white vinegar
1 tsp yellow mustard
1/2 tsp salt
1/2 tsp garlic powder
1/2 tsp onion powder
1/2 tsp paprika
1/4 tsp smoked paprika (opt.)
1/4 tsp black pepper
15 oz can navy beans, drained and rinsed
1 c. water

Heat the oil in a saucepan over medium-high heat. Add the onion and bell pepper and cook for 3 minutes. Add the garlic and cook for 30 seconds. Add all the ingredients up to the beans and whisk to combine. Add the beans and water and bring to a boil. Reduce heat and simmer until the liquid thickens, about 30 minutes.

Thursday, February 2, 2012

Grandma's Vanilla Pudding

Vanilla pudding. So simple, yet so versatile. I felt an acute desire to talk to Grandma as I worked on this recipe. I actually made two batches because my first attempt was lumpy. You see, I was having to make up the cooking directions because this recipe came with ingredients only and Grandma's not here to ask how she made this. I still don't think I have it down pat. But, I'll clue you in to how I made this, and if you want to try your own way, go for it!

To dress up my dish of pudding, I sautéed chopped apples and pecans in butter with a few sprinkles of cinnamon and a drizzle of honey. But you could choose to drizzle a puree of frozen berries over top. Or a dollop of fruit jam. Or just eat it plain-jane vanilla. The possibilities are endless. Simple, yet versatile. Not too sweet, leaving room for tastes to shine through. So much about this recipe reminds me of Grandma.


GRANDMA'S VANILLA PUDDING
Print This Recipe

2 c. milk

3 Tbsp honey or 1/4 c. brown sugar

2 eggs, well beaten

3 Tbsp cornstarch or 6 T. flour

1 tsp vanilla

Garnish with fruit, coconut etc.


Heat milk in a saucepan over medium-low heat, whisking frequently to prevent scalding. Beat eggs and honey or brown sugar together. When milk is steaming, slowly whisk in egg mixture.


In a small bowl add cornstarch, dip a few spoonfuls of the hot milk/egg mixture into the bowl and using a fork or whisk, mix until smooth. While whisking, slowly pour in the cornstarch mixture and continue to whisk until pudding thickens.


Turn off heat and stir in the vanilla. Pour into several small bowls, or one larger bowl and press a piece of plastic wrap onto the surface. Refrigerate until cool.


To serve, top with desired fruits or nuts.

Thursday, January 26, 2012

Grandma's Easy Chicken Salad

For many summers, we would drive up to Grandpa and Grandma's and spend a long morning blueberry picking at a nearby blueberry farm. Grandma always packed a picnic lunch and after picking 70+ pounds of blueberries, we'd head to a local park for lunch. Something I've always appreciated about Grandma was her care and preparation of balanced meals, the picnic would include fruit, raw veggies, homemade cookies, sometimes chips, and sandwich makings--bread, peanut butter and jelly, condiments, lunchmeat or this chicken salad.

Grandma gave me this recipe at one of my bridal showers. Although the recipe is typed up (her exact recipe is below), in her neat handwriting she signed the bottom corner with Grandma C.

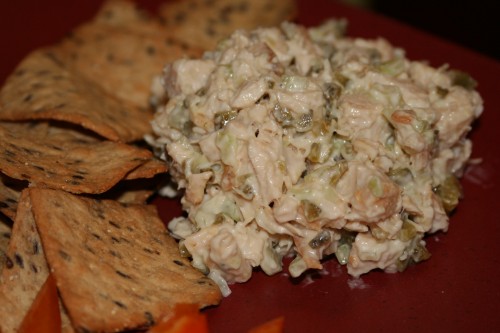
This comes together quickly and is just right for seasonings and flavors. I usually make a fruited chicken salad, so I found this sweet pickle version a lovely change. We enjoyed it with crackers, but it would make a perfect sandwich as well.


GRANDMA'S EASY CHICKEN SALAD
Print This Recipe


1/3 c. finely chopped celery
1/4 c. chopped sweet pickle
2 tsp finely chopped onion
1/2 c. mayonnaise
1 Tbsp lemon juice
1/2 tsp salt
dash of pepper
1 1/2 c. chopped cooked chicken

Combine celery, pickle, and onion. Combine next four ingredients; fold into celery mixture along with chopped cooked chicken. Cover and chill.

Monday, January 23, 2012

Grandma's 5 Cup Salad

First, thank you for your kind thoughts and comments. We had a long but beautiful weekend with our family - lots of tears, lots of laughter, and lots of memories. We have a great big, supportive family and it was truly wonderful to be together even for such a sad occasion. We miss her but we rejoice for her.

_______________________________________________________________________


A few years back, I was planning and hoping to compile a family cookbook and began collecting family recipes. I still hope to do that. Instead, we had the best kind of interruption and found out that #3 was on the way very quickly - surprise! We learned of our youngest in early July and he was born mid August. His adoption was finalized in November. Whirlwind. Sometimes I still think we are recovering and he is 3. :) My sweet Grandparents were some of the first people I called with the news of our eminent arrival. They were excited for us. I have pictures of my grandma holding him when he was maybe 4 or 6 weeks old. She loved babies and she got to see him quite a bit those first few months as we had 3 family weddings within 6 weeks.

Anyway, I was looking through the recipes she submitted - some were new to me and others were old standbys. This recipe is the latter. It's quick, easy, and delicious. I most remember it coming to picnics - we are big on pitch-ins and picnics in our family. Oh and I must mention that one thing I really admired about my Grandma is that she regularly tried new recipes. A funny thing is that she sometimes apologized for her food which was, in fact, nearly always delicious. It was not fake modesty, it was genuine humility - she was definitely not a praise seeker.

So here is her 5 Cup Salad to kick off our time of tribute to one of our favorite cooks and one of our favorite people! I made it just as she wrote and chose to add pecans because I think that is mostly what she did. She really liked nuts. You could easily add both coconut and nuts but then it would be 6 Cup Salad or you could add 1/2 and 1/2 or just pick your favorite.  Also, I used red grapes. I'm pretty sure this salad was served at the funeral dinner on Saturday or at least several like it.


GRANDMA'S 5 CUP SALAD

1 c. mandarin oranges, drained
1 c. pineapple chunks, drained
1 c. seedless grapes
1 c. coconut or nuts
1 c. sour cream

Mix and serve.

(P.S. I'll add the printable link later - my computer is in the shop and I don't have a pdf writer on my back up one.)

Saturday, December 24, 2011

Overnight Coffee Cake

In case you still haven't set your Christmas breakfast menu, let me offer this delicious coffee cake! My favorite part is that you make it the night before and refrigerate it overnight before baking. In the morning you can stick it in the oven and hit snooze a couple more times or send your significant other down to stick it in while you stay asleep - I would, of course, never  do that (hehehe). This recipe is delicious and you are a total rockstar for effortlessly serving a warm cake.

I like to pair this with egg casserole which can also be made the night before AND they can be baked at the same time. WIN! Now you will actually need to accept an award for your fabulous, organized, awesome breakfast - I promise I'll keep the easiness a secret from your admirers... :) The awesome thing about this egg casserole is that you can customize it for your taste - you can add veggies, herbs, different meats, or various kinds of cheese - it is an all-time family favorite!

You will thank your self for getting it done the night before and you will love the results! I serve with coffee and tea and with fruit juice and/or fruit salad. Since it's the holidays, sometimes we will sneak in some of our favorite(!) eggnog from the local creamery or a wonderful champagne cocktail or sparkling wine. Delish!


OVERNIGHT COFFEE CAKE
Print This Recipe

3/4 c. (1 1/2 sticks) butter, softened
1 c. sugar
2 eggs
1 tsp. vanilla extract
2 c. flour
1 tsp. baking soda
1 tsp. cinnamon
1/4 tsp. nutmeg
1/2 tsp. salt
1 c. yogurt (or sour cream)
3/4 c. packed brown sugar
1/2 c. chopped pecans
1 teaspoon ground cinnamon
1 1/2 cups confectioners' sugar
3 tablespoons milk

In a mixing bowl, cream butter and sugar. Add vanilla. Add eggs, one at a time, beating well after each addition. Combine the flour, baking soda, cinnamon, nutmeg and salt; add to the creamed mixture alternately with yogurt. Pour into a greased 9x13 in. baking dish.

In a small bowl, combine the brown sugar, pecans and cinnamon; sprinkle over coffee cake. Cover and refrigerate overnight.

Remove from the refrigerator 30 minutes before baking. Bake, uncovered, at 350 degrees F for 35-40 minutes or until a toothpick inserted near the center comes out clean. Cool on a wire rack for a few minutes. Combine confectioners' sugar and milk; drizzle over warm coffee cake.

Tuesday, June 14, 2011

My Kitchen View: Freezing & Marinade

I recently spent a few hours putting some meals in the freezer. It's not generally my style - you may have noticed that there really aren't many casserole recipes here. However, I like the concept of easy, go-to meals and despite my general lack of excitement about casseroles, I decided I could make it work. So, many of the meals were meat in marinade which means all I need to do is thaw and grill. My kind of summer meal!

The meal round up (my sister helped and we made 26 meals in a matter of a few hours!) included burgers (ground turkey & beef combined), meatballs, taco meat, pizza kits (dough, sauce, browned meat & onions, and cheese frozen together), sweet and sour chicken, pork roasts in marinade, BBQ drumsticks, marinated chicken and pork. So far, we have really enjoyed everything. I plan to do this a few times a year to make life a little easier on the days I work or for when I just need a break from cooking. It's really makes meals pretty easy - I just add a salad or steamed vegetables and fruit or bread to make a complete meal. 

First, you need to start with fresh meat. DO NOT thaw and re-freeze meat. Add the desired portion into a freezer bag or container and pour in marinade. Clearly label the package and include the date. Place in freezer until ready to use. I try to remember and stick the meat I want for a meal in the refrigerator the day before we are going to eat it.  

Here is a marinade recipe that made a lot - I was able to use it on about 5 or 6 packages of meat (good thing we liked it! :)). I used it on pork chops and chicken breasts. We've tried it on the pork and it was wonderful! We sauteed some baby bella mushrooms in butter and topped the pork chops with them for serving. Delicious!


MARINADE (adapted slightly from from allrecipes.com)
Print This Recipe

1 1/2 c. canola oil
3/4 c. soy sauce
1/2 c. Worcestershire sauce
1/2 c. red wine vinegar
1/3 c. lemon juice
2 Tb. dry mustard
1 tsp. salt
1 Tb. black pepper
1 1/2 tsp. finely minced fresh parsley (or 1 tsp. dried parsley)
In a medium bowl, mix together oil, soy sauce, Worcestershire sauce, wine vinegar, and lemon juice. Stir in mustard powder, salt, pepper, and parsley. Use to marinate meat before cooking as desired.

Monday, March 21, 2011

Market Fresh: Pearl Onions

Generally speaking, I have not been a recent fan of Taste of Home but the March issue had surprising number of recipes I was interested in trying (and so I must give them a little credit!). It featured several onion recipes and I tried the glazed pearl onions with great success. they were very easy, a little high in sugar & fat, and very good. :) They are a wonderful side dish and wold be especially good served with steak.


GLAZED PEARL ONIONS - adapted very slightly from Taste of Home, March 2011
Print This Recipe

1 package (16 ounces) frozen pearl onions, thawed
2 tablespoons butter
2 tablespoons brown sugar
1 tablespoon Dijon mustard
2 tablespoons minced fresh parsley

In a large skillet, saute onions in butter until tender. Add brown sugar and mustard; cook 2 minutes longer. Sprinkle with parsley. 6 servings.

Thursday, March 10, 2011

Baker's Delight: Salted Toffee-Chocolate Squares

Honestly, I just didn't know what to make for today. It's been a long couple of weeks filled with illness at our house and my desire to cook and bake has been almost non-existant. And so, I looked at magazines and websites looking for something that would inspire me. I wrote to one of my friends that I was at a loss...and then, I happened to pick up my May 2010 issue of Everyday Food. I turned to the back for the index and instead, I came across this recipe. I had everything on hand and decided to give it a shot.

Oh. My. Goodness. These are amazing. They combine so much yumminess into one cookie that I can hardly stand it! They certainly aren't on the "healthy list" but they are worth the splurge. The coarse salt is just the perfect flavor addition - makes all of the flavors come alive. I had to walk away from the pan of cookies; in fact, I had to go upstairs so I would not eat more. So, without further ado, here is the amazing and easy recipe!


SALTED TOFFEE-CHOCOLATE SQUARES
(Everyday Food, May 2010)
Print This Recipe

13 graham crackers
1 bag (8 ounces) toffee bits
1 1/2 cups coarsely chopped toasted natural almonds
1/2 cup sugar
1 cup (2 sticks) unsalted butter
3/4 cup (4 ounces) bittersweet chocolate, chopped, or chocolate chips (I used mini chocolate chips)
3/4 teaspoon coarse salt

Preheat oven to 350 degrees. Line a rimmed baking sheet with foil. Place graham crackers in a single layer on sheet, edges touching. Sprinkle toffee bits and almonds over graham crackers.

In a small saucepan, bring sugar and butter to a boil over medium-high. Reduce heat and cook at a rapid simmer, swirling pan occasionally, until mixture is syrupy, 2 minutes. Immediately pour over graham crackers. Bake until sugar topping is bubbling, 12 minutes. Remove from oven and immediately sprinkle chocolate and salt over graham crackers. With a sharp knife or pizza cutter, cut into 2-inch squares. Let cool completely on sheet on a wire rack. (Store in an airtight container, up to 1 week.)

Read more at Marthastewart.com: Salted Toffee-Chocolate Squares Recipe - Martha Stewart Recipes

Monday, February 28, 2011

Healthy Living: Black Bean Dip

Looking for a healthy dip alternative? I was - I wanted a guilt free dip that I could enjoy with vegetables or for a treat with tortilla chips. This recipe is the result and I was so pleased with the delicious, easy, healthy dip created with such simple ingredients!


BLACK BEAN DIP
Print This Recipe

2 cans black beans (1 drained, 1 not)
1/2 c. cilantro
1/2 tsp. lime zest
juice of 1 lime
1 jalapeno, cut into large chunks
1/2-1 tsp. salt

Combine all ingredients in a food processor or blender. Process until smooth and creamy. Chill before serving or serve at room temperature. Serve with prepared vegetables or tortilla chips. Enjoy!

Monday, February 14, 2011

Crock Pot Cooking: Dessert

I love my slow cookers (yes, I have two). One of my goals has been to make sure and put dinner in the crock pot at least once a week when I work. The wonderful food fills the house with delicious smells while slowly cooking to perfection. It takes little effort and generally yields great results. Planning ahead also means saving time in the evening and means less temptation to order out thus saving money. We've enjoyed various soups, chicken, and roasts.

Yesterday, I used my crock pots for Sunday dinner. It made for a very nice but easy dinner. I decided on a Chicken Rice Soup for the main dish since I had left over chicken already on hand. It was quite good with a basmati/wild rice mix in it. 


When we got home from church, I quickly made pretzel shaped rolls (from my pizza dough recipe) and a salad to accompany it. 


But I also decided to try making a dessert...Hot Fudge Cake to be exact. I saw the recipe in Fix It & Forget It Lightly and was intrigued. This deliciously moist pudding cake creastes it's own hot fudge sauce underneath. I served it warm with fresh whipped cream but vanilla ice cream would also be good. I decided that some fresh raspberries or a raspberry puree would have made it just about perfect. It was very easy and took a little under two hours on high until it was done. So, it you want a yummy, fudgey, easy dessert, you should definitely give this rich cake a try. If I were to make it again, I would reduce the amount of sugar - it's quite a lot. But for an occasional dessert treat, I was willing to overlook that. :)


SLOW COOKER HOT FUDGE CAKE
Fix It & Forget It Lightly
Print This Recipe

1 ¾ c. brown sugar, divided
1 c. flour
3 Tb. plus ¼ c. cocoa powder, divided
1 ½ tsp. baking powder
½ tsp. salt
½ c. milk
2 Tb. butter, melted
½ tsp. vanilla
1 ¾ c. boiling water

In a mixing bowl, mix together 1 c. brown sugar, flour, 3 Tb. cocoa powder, baking powder, & salt

Stir in milk, butter, and vanilla.

Pour into slow cooker sprayed with non-stick spray.

In a separate bowl, combine ¾ c. brown sugar and ¼ c. cocoa powder. Sprinkle over batter in the slow cooker. Do not stir.

Pour boiling water over mixture. Do not stir.

Cover. Cook on high 1 ½ - 1 ¾ hours, or until toothpick inserted into cake comes out clean.

Friday, December 24, 2010

Weekend Fare: Waffles & Syrup

These delicious waffles and warm, buttery, rich, homemade syrup make for a wonderful Christmas breakfast or brunch or even just a lazy winter morning treat. We picked up our Belgian waffle maker on a black Friday sale for $10 and it's awesome! This recipe made not quite enough for my hungry crew. :) I would probably make half again more.


BELGIAN WAFFLES - adapted from allrecipes.com
Print This Recipe

4 egg yolks
2 tsp. vanilla extract
2 c. buttermilk
1/2 c. butter, melted
2 c. all-purpose flour
1 Tb. baking powder
1 tsp. baking soda
1 Tb. white sugar
1/2 tsp. salt
1/2 tsp. ground cinnamon
4 egg whites

Preheat your waffle iron.

In a medium bowl, whisk together the eggs, vanilla, buttermilk and butter until well blended. Combine the flour, baking powder, baking soda, sugar, salt and cinnamon; stir into the buttermilk mixture. In a separate bowl, whip the egg whites with an electric mixer until stiff. Fold into the batter.

Spoon batter onto the hot waffle iron, close, and cook until golden brown. Waffles are usually done when the steam subsides.

BUTTERMILK SYRUP - allrecipes.com

1/2 c. butter
1 c. sugar
1 c. buttermilk
1 Tb. vanilla extract
1 Tb. corn syrup
1/2 tsp. ground cinnamon
1/2 tsp. baking soda

Bring butter, sugar, buttermilk, vanilla extract, corn syrup, and cinnamon to a simmer in a large saucepan over medium-high heat. Once simmering, whisk in baking soda, and cook for 10 seconds before removing from heat. Serve warm.

Tuesday, December 21, 2010

Holiday Treats: Fudge

Peanut butter fudge is a traditional confection for me - my grandma made it every year and we loved it. But I was disappointed the last time I made peanut butter fudge - it just didn't have that creamy texture and peanut flavor so I decided to try again with a new recipe. This one was a hit! It is from Alton Brown and seriously was so easy! It will definitely make my yearly "to make" list.


PEANUT BUTTER FUDGE - Food Network, Alton Brown
Print This Recipe

1 cup butter, plus more for greasing pan
1 cup peanut butter
1 teaspoon vanilla
1 pound powdered sugar

Microwave butter and peanut butter for 2 minutes on high. Stir and microwave on high for 2 more minutes. Add vanilla and powdered sugar to peanut butter mixture and stir to combine with a wooden spoon.

Pour into a buttered 8 by 8-inch pan lined with waxed paper. Place a second piece of waxed paper on the surface of the fudge and refrigerate until cool. Cut into 1-inch pieces and store in an airtight container for up to a week.

______________________________________________________


It also seemed time to try a new fudge recipe. While I like my old one, it makes a huge 9x13 and sometimes just doesn't come out as creamy as I would like. So, I read more fudge recipes than you can count and finally settled on one. It did not disappoint - it was very good and I plan to make another batch before the end of the year. I skipped the nuts and just kept the rich, chocolatey flavor all on it's own. I'm certain you could mix kinds of chocolate or change it to whatever suits your taste!


CHOCOLATE FUDGE - adapted slightly from allrecipes.com
Print This Recipe

3 c. semi-sweet chocolate chips
1 (14 oz.) can sweetened condensed milk
1/8 tsp. salt
1 1/2 tsp. vanilla extract

In heavy saucepan, over low heat, melt chocolate chips with sweetened condensed milk and salt. Remove from heat;  and vanilla.

Spread evenly into buttered aluminum-foil-lined 8- or 9-inch square pan. Chill 2 hours or until firm.

Lift fudge out of pan and place onto cutting board; peel off paper and cut into 1 inch squares. Store covered in the refrigerator.

Thursday, November 11, 2010

Weekend Fare: Pumpkin Dip & Pumpkin Pie Spice

Our magazine review will be tomorrow with our picks for the best Thanksgiving magazines!

Today, I'm sharing a recipe that wouldn't generally be in my repetoire but is delicious and very easy for holiday entertaining, so I'm making an exception. :) This is a quick, easy, and wonderful dessert dip. It's great for this time of year - perfect for showers, open houses, and snacks. I requested the recipe after enjoying it at an event and modified a little for our taste. You can serve this with gingersnaps, cinnamon grahams, cinnamon pita chips or whatever else sounds good to you!


PUMPKIN FLUFF DIP
Print These Recipes

1 container (8 ounce size) frozen whipped topping, thawed (or equivalent stabilized, sweetened whipped cream)
1 box (5 ounce size) instant vanilla pudding mix
1 can (15 ounce size) solid pack pumpkin
1 1/2 tsp. pumpkin pie spice (I make my own - recipe below)

In a large bowl, mix together instant vanilla pudding mix, pumpkin and pumpkin pie spice. Fold in the thawed frozen whipped topping. Chill in the refrigerator until serving.

PUMPKIN PIE SPICE
4 tsp. Cinnamon
2 tsp. Ginger
2 tsp. Nutmeg
1 tsp. Allspice
1 tsp. Cloves

Combine and store in an airtight container.

Friday, October 1, 2010

Foodie Fridays & Weekend Fare

What great recipes and posts were submitted last week for Foodie Fridays! I didn't get a chance to comment on all of them but they were wonderful! Hope you all had a chance to check them out. A big thanks to those of you who participated!

Weekend Fare: Fish is something that I find difficult to get right. Seems like it's too dry, too fishy, or...you name it! The long and the short is that I keep trying and this week my whole family loved the fish. :) I used Tilapia fillets which were mild and delicious. You could use lime instead of lemon if you want. Fish is one of the quickest meals to prepare - these bake in about 10-12 minutes.


LEMON TILAPIA (you could substitute another white fish if you prefer)
Print This Recipe

4 Tilapia fillets
salt & pepper
zest of 1/2-1 lemon
juice of 1/2 lemon
1 Tb. butter

Pre-heat oven to 375 degrees. Rinse and pat dry the fish. Season with salt & pepper on both sides. Arrange in a greased pan. Zest lemon over the fillets. Squeeze fresh juice over it all. Bake for 10-12 minutes until it flakes easily with a fork. Remove fish from oven. Divide butter into 4 equal parts and top each fillet with the butter allowing it to melt into the fish. Enjoy!

*I'm certain you could omit the butter but it just made the dish so delicious. And I served it with a brown rice pilaf (I omitted the butter in it) and a green salad.

_________________________________________________


FOODIE FRIDAYS!


Welcome to another edition of Foodier Fridays! There is so much we can learn and share from one another! We hope you will find this feature encouraging and inspiring.

Here are just a few guidelines for participating in Foodie Fridays:
1) Leave a link to your post with Mr. Linky (you can also click on Mr. Linky to check out who has linked up!).
2) Your entry can include a recipe, a kitchen success, an ingredient, a tradition, a book/magazine/restaurant review, a favorite (or not) tool or gadget, food photos, recipe website, a food memory, a cooking or eating experience or anything food related.
3) Please link back here in your participating post.

Hope you have fun, meet new people, learn a few things, feel encouraged, and find inspiration as you cook, bake, and entertain!